云函数搭建版本更新至2.0 |
||
|---|---|---|
| go-scf | ||
| go-wecomchan | ||
| .gitignore | ||
| LICENSE | ||
| ONLINE.md | ||
| README.md | ||
| dotNetCore.cs | ||
| index.php | ||
README.md
Wecom酱
通过企业微信向微信推送消息的解决方案。包括:
- 配置说明(本页下方)
- 推送函数(支持多种语言,见本页下方)
- 自行搭建的在线服务源码
🎈 本项目属于方糖推送生态。该生态包含项目如下:
- Server酱Turbo:支持企业微信、微信服务号、钉钉、飞书群机器人等多通道的在线服务,无需搭建直接使用,每天有免费额度
- Wecom酱:通过企业微信推送消息到微信的消息推送函数和在线服务方案,开源免费,可自己搭建。支持多语言。
- Tele酱:可以通过 Vercel 免费部署,且部署后 API 在国内网络可访问的 Telegram 多账户消息推送机器人
企业微信应用消息配置说明
优点:
- 一次配置,持续使用
- 配置好以后,只需要微信就能收消息,不再需要安装企业微信客户端
PS:消息接口无需认证即可使用,个人用微信就可以注册
具体操作
第一步,注册企业
用电脑打开企业微信官网,注册一个企业
第二步,创建应用
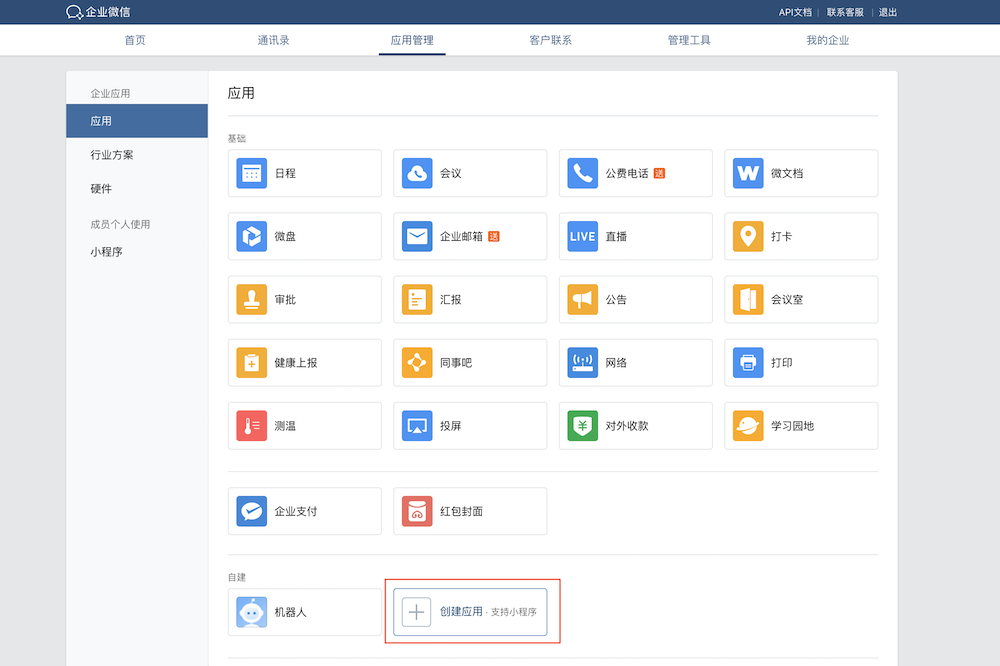
注册成功后,点「管理企业」进入管理界面,选择「应用管理」 → 「自建」 → 「创建应用」
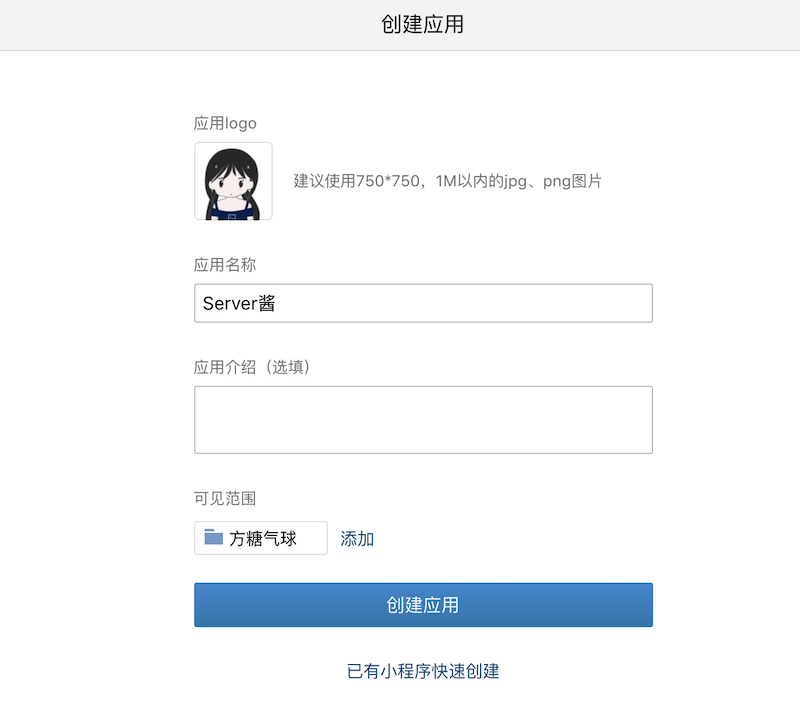
应用名称填入「Server酱」,应用logo到这里下载,可见范围选择公司名。
创建完成后进入应用详情页,可以得到应用ID( agentid )①,应用Secret( secret )②。
注意:secret推送到手机端时,只能在企业微信客户端中查看。
第三步,获取企业ID
进入「我的企业」页面,拉到最下边,可以看到企业ID③,复制并填到上方。
推送UID直接填 @all ,推送给公司全员。
第四步,推送消息到微信
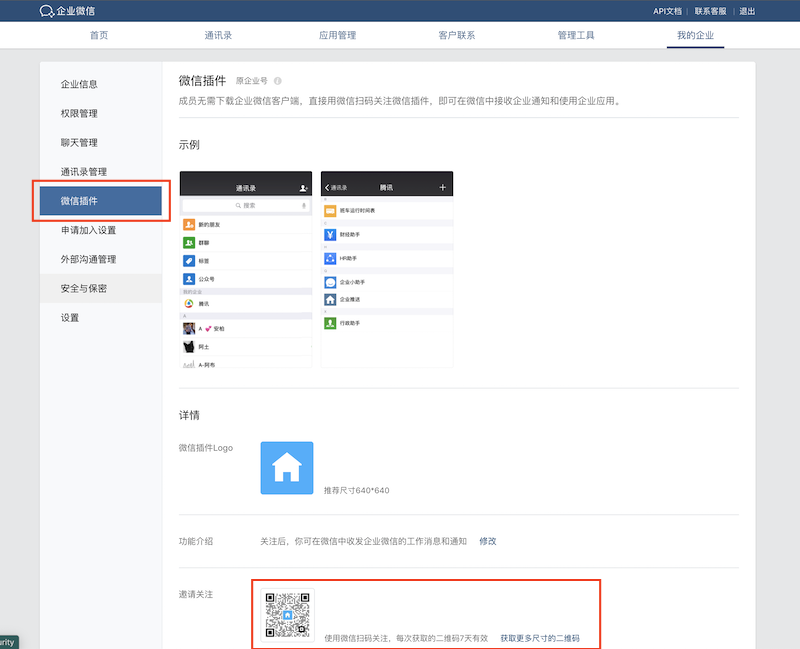
进入「我的企业」 → 「微信插件」,拉到下边扫描二维码,关注以后即可收到推送的消息。
PS:如果出现接口请求正常,企业微信接受消息正常,个人微信无法收到消息的情况:
-
进入「我的企业」 → 「微信插件」,拉到最下方,勾选 “允许成员在微信插件中接收和回复聊天消息”

第五步,通过以下函数发送消息:
PS:为使用方便,以下函数没有对 access_token 进行缓存。对于个人低频调用已经够用。带缓存的实现可查看 index.php 中的示例代码(依赖Redis实现)。
PHP版:
function send_to_wecom($text, $wecom_cid, $wecom_aid, $wecom_secret,  $wecom_touid = '@all')
{
    $info = @json_decode(file_get_contents("https://qyapi.weixin.qq.com/cgi-bin/gettoken?corpid=".urlencode($wecom_cid)."&corpsecret=".urlencode($wecom_secret)), true);

    if ($info && isset($info['access_token']) && strlen($info['access_token']) > 0) {
        $access_token = $info['access_token'];
        $url = 'https://qyapi.weixin.qq.com/cgi-bin/message/send?access_token='.urlencode($access_token);
        $data = new \stdClass();
        $data->touser = $wecom_touid;
        $data->agentid = $wecom_aid;
        $data->msgtype = "text";
        $data->text = ["content"=> $text];
        $data->duplicate_check_interval = 600;

        $data_json = json_encode($data);
        $ch = curl_init();
        curl_setopt($ch, CURLOPT_HTTPHEADER, ['Content-Type: application/json']);
        curl_setopt($ch, CURLOPT_URL, $url);
        curl_setopt($ch, CURLOPT_RETURNTRANSFER, true);
        @curl_setopt($ch, CURLOPT_FOLLOWLOCATION, true);
        curl_setopt($ch, CURLOPT_POST, true);
        curl_setopt($ch, CURLOPT_TIMEOUT, 5);
        curl_setopt($ch, CURLOPT_POSTFIELDS, $data_json);

        curl_setopt($ch, CURLOPT_SSL_VERIFYHOST, false);
        curl_setopt($ch, CURLOPT_SSL_VERIFYPEER, false);

        $response = curl_exec($ch);
        return $response;
    }
    return false;
}
使用实例:
$ret = send_to_wecom("推送测试\r\n测试换行", "企业ID③", "应用ID①", "应用secret②");
print_r( $ret );
PYTHON版:
import json,requests
def send_to_wecom(text,wecom_cid,wecom_aid,wecom_secret,wecom_touid='@all'):
    get_token_url = f"https://qyapi.weixin.qq.com/cgi-bin/gettoken?corpid={wecom_cid}&corpsecret={wecom_secret}"
    response = requests.get(get_token_url).content
    access_token = json.loads(response).get('access_token')
    if access_token and len(access_token) > 0:
        send_msg_url = f'https://qyapi.weixin.qq.com/cgi-bin/message/send?access_token={access_token}'
        data = {
            "touser":wecom_touid,
            "agentid":wecom_aid,
            "msgtype":"text",
            "text":{
                "content":text
            },
            "duplicate_check_interval":600
        }
        response = requests.post(send_msg_url,data=json.dumps(data)).content
        return response
    else:
        return False
使用实例:
ret = send_to_wecom("推送测试\r\n测试换行", "企业ID③", "应用ID①", "应用secret②");
print( ret );
TypeScript 版:
import request from 'superagent'

async function sendToWecom(body: {
  text: string
  wecomCId: string
  wecomSecret: string
  wecomAgentId: string
  wecomTouid?: string
}): Promise<{ errcode: number; errmsg: string; invaliduser: string }> {
  body.wecomTouid = body.wecomTouid ?? '@all'
  const getTokenUrl = `https://qyapi.weixin.qq.com/cgi-bin/gettoken?corpid=${body.wecomCId}&corpsecret=${body.wecomSecret}`
  const getTokenRes = await request.get(getTokenUrl)
  const accessToken = getTokenRes.body.access_token
  if (accessToken?.length <= 0) {
    throw new Error('获取 accessToken 失败')
  }
  const sendMsgUrl = `https://qyapi.weixin.qq.com/cgi-bin/message/send?access_token=${accessToken}`
  const sendMsgRes = await request.post(sendMsgUrl).send({
    touser: body.wecomTouid,
    agentid: body.wecomAgentId,
    msgtype: 'text',
    text: {
      content: body.text,
    },
    duplicate_check_interval: 600,
  })
  return sendMsgRes.body
}
使用实例:
sendToWecom({
  text: '推送测试\r\n测试换行',
  wecomAgentId: '应用ID①',
  wecomSecret: '应用secret②',
  wecomCId: '企业ID③',
})
  .then((res) => {
    console.log(res)
  })
  .catch((err) => {
    console.log(err)
  })
.NET Core 版:
using System;
using RestSharp;
using Newtonsoft.Json;
namespace WeCom.Demo
{
    class WeCom
    {
        public  string SendToWeCom(
            string text,// 推送消息
            string weComCId,// 企业Id①
            string weComSecret,// 应用secret②
            string weComAId,// 应用ID③
            string weComTouId = "@all")
        {
            // 获取Token
            string getTokenUrl = $"https://qyapi.weixin.qq.com/cgi-bin/gettoken?corpid={weComCId}&corpsecret={weComSecret}";
            string token = JsonConvert
            .DeserializeObject<dynamic>(new RestClient(getTokenUrl)
            .Get(new RestRequest()).Content).access_token;
            System.Console.WriteLine(token);
            if (!String.IsNullOrWhiteSpace(token))
            {
                var request = new RestRequest();
                var client = new RestClient($"https://qyapi.weixin.qq.com/cgi-bin/message/send?access_token={token}");
                var data = new
                {
                    touser = weComTouId,
                    agentid = weComAId,
                    msgtype = "text",
                    text = new
                    {
                        content = text
                    },
                    duplicate_check_interval = 600
                };
                string serJson = JsonConvert.SerializeObject(data);
                System.Console.WriteLine(serJson);
                request.Method = Method.POST;
                request.AddHeader("Accept", "application/json");
                request.Parameters.Clear();
                request.AddParameter("application/json", serJson, ParameterType.RequestBody);
                return client.Execute(request).Content;
            }
            return "-1";
        }
}
使用实例:
   static void Main(string[] args)
        {   // 测试
            Console.Write(new WeCom().SendToWeCom(
            "msginfo",
            "企业Id①"
            , "应用secret②",
            "应用ID③"
            ));
        }

    }
其他版本的函数可参照上边的逻辑自行编写,欢迎PR。


